Call window
The call window is the information and control centre for your phone calls. In addition to the visualisation of the call state, dialog partner and other relevant informations about the call, it is also possible to control the call. The window combines logically related telephone conversations in one interface and in this way allows the convenient control of one or more conversations on a telephone. With the option of making project assignments, selecting private conversations and writing memes, this window is a central element of estos ProCall.
Call window overview:

[1] Call state
[2] Active line
[3] List of calls
[4] Control
[5] Call Memo / Project settings
The call window, as shown above, is divided vertically into three areas.
- A list of calls
The call window can manage and control one or more calls or even a conference call. All calls which belong together are displayed in a call window.
- Phone control
The call control area enables you to control the active call.
- Memo area with project, private labelling, phone number display suppression
The memo area extends the phone information and control with a collection of information about the call. The memo entered is written into the journal of all call participants when the window is closed. If finished calls are removed from the call window, the given note is stored at that time. To be able to set projects and mark private calls adds to the information pool. For more information about the project settings and private settings see Projects.In this area you still have the option of suppressing the display of your phone number by switching on the phone number display suppression. The remote station called then does not see who is calling. (Does not work with every phone system and not with internal calls).
Icon Meaning 
Phone number suppression deactivated 
Phone number suppression activated
Overview of the individual call in the call window:
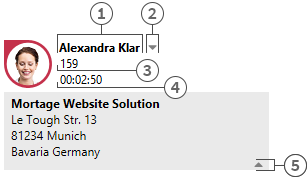
[1] Call partner
[2] Contact chooser
[3] Phone number
[4] Call duration
[5] Hide contact details
- Status icon
The status icon shows the current state of the call. A list of status icons used can be found here. Apart from the visualisation, you can open the journal created for he current call participant via the icon. If the window contains several calls you can select a call by means of the icon and call this contact again. A tooltip on the icon displays a brief summary of the most important call information.
- Call partner
estos UCServer and estos ProCall search automatically for a contact for the phone number during a call. The contact found is displayed here if available. If no contact could be found you can create a new contact here.
You can read about which data sources can be searched in which order during a contact search in Contact search. If several contacts are found a button appears next to the contact to enable selection of a contact.
- Contact selection
If several contacts are found for the current phone number, you can select a particular dialog partner by means of the contact selection. estos ProCall stores this selection and will show you this contact as your dialog partner the next time he calls again. Further information about searching for contacts in estos UCServer and ProCall can be found under contact search.
- Number
The number is displayed next to the status icon. The tooltip always contains the call status and number.
You can change the dialog partner's number for a prepared or ended call here. A new contact search is automatically triggered if you change the number.
- Call duration
Displays how long you have been connected with the dialog partner.
- Show contact details
One of the strengths of estos ProCall is the option of extending the call window with dynamic HTML content. You can show and hide the display of additional information with this button. A series of templates are available for displaying further information which you can adapt to your needs.
The template defines which contact details are to be shown. You will find the templates in the installation directory in Templates/default/:- RemoteContact.xslt
Is used in the call window for preprocess details for the current dialog partner. The template defines which contact details are displayed. - HoldContact.xslt
Is used in the call window to preprocess the details for a dialog partner on hold. The partner on hold is displayed if a further estos ProCall user holds a subscriber while calling you. The template defines which contact details are displayed. - LocalContact.xslt Is used in the call window to preprocess details for the contact called. In case of an incoming call the contact called is displayed if a contact's number is found. For this you must activate the hotline services in the settings for incoming calls. The template defines which contact details are displayed.
- RedirectedContact.xslt
Is used in the call window to preprocess the contact details for a forwarded call. The contact for whom the call was last signalled is displayed. The template defines which contact details are displayed.
In order to make customisation of the call window templates as simple as possible, you can display the XML contact and call data provided and also the result of the XSLT parser. Copy the appropriate template out of the default directory into the template folder, open it and change the value of variable debug in the body tag to 1:<body minwidth="0" minheight="0" maxwidth="0" maxheight="0" debug="1">
After you have reloaded the contents of the call window by pressing F5, the displayed templates appear with a colored background. A context menu permits you to view the source code. The upper part of the text file contains the parsed template; the lower part contains the raw XML data which was handed to the parser. Further information on developing your own XSLT templates can be found here. - RemoteContact.xslt
Conference

[1] Conference controller
[2] Conference participant
[3] Controls for the conference
The call window is displayed in the format shown above as soon as you initiate a conference. You can no longer directly control the individual calls but only the conference which is displayed as the uppermost entry in the call list. How long the conference has been running is shown next to the number of conference participants. The further elements of of the call window are similar to those described above.
The various control options:
Depending on the telephony status you can perform various control actions on the current call. The visibility of the individual buttons is significantly influenced by the function range of the phone system.
| Icon | Meaning |
|---|---|
 |
Set up dialing for the phone number currently stored in the call window: |
 |
The currently selected contact in the call window offers several numbers. Via the icon select you can choose another of the contact's phone numbers. The call is not yet initiated. The icon call starts the call. |
 |
Accept an incoming call. The phone switches to hands-free mode. Analogue phones do not support this feature. |
 |
End current call. Reject incoming ringing call. End consultation call End conference. End auto-dial. |
 |
The current phone status either permits ending various calls or you can connect subscribers to each other by hanging up. The combo menu displays which actions are supported. The hang-up key ends the current call. |
 |
Hold current caller. The subscriber is either put on hold or a callback is initiated depending on the phone system. |
 |
Retrieve subscriber on hold |
 |
Begin callback. A window opens for searching for contacts or entering numbers. The window contains the last targets for callbacks and forwardings. |
 |
Call on hold. Current call participant is on hold and call participant which was on hold gets connected. |
 |
Initiate conference. Initiate a conference with the current dialog partner and the dialog partner on hold. |
 |
Add dialog partner to the conference being held. |
 |
Forward call. A window opens for searching for contacts or entering numbers. The window contains the last targets for callbacks and forwardings. |
 |
Forward call. You have access to your contact's further phone numbers via the check box. Thus, you can quickly forward a call on your cordless or mobile phone. The Forward button opens the contact dialog as described under Forwarding. |
 |
If the number called is engaged you can start automatic redialing via this icon. An attempt is made to call the subscriber again after a certain period of time. At what intervals and how often this redialing should take place can be defined in the settings Outgoing calls define. |
 |
Activates the Callback when no answer or engaged function. A callback to this subscriber is started as soon as the remote station is available again. |
 |
Planning a new call to the current contact's last connected number. If the select button is visible, you can choose one of the contact's other phone numbers for the planned call. |
 |
The current call will be restored to the planned status e.g. for setting other project settings. If the select button appears, you can choose other phone numbers of the contact for planing the call. |
 |
Begin call recording. If call recording is set up on the server, you can thus start call recording which is sent to you as an e-mail after the end of the call. This is possible both with a dialog partner and a conference. |
 |
End current call recording. |
 |
Opens a dialog for subsequent selection of DTMF tones. Input can be made with both the keyboard and the mouse. |
 |
If various buttons are not visible either the current phone status or the phone system driver do not permit this action. |
Version 8