Dashboard settings
 |
Settings |
For the dashboards, in the dialog under Settings Manage time-scheduled tasks, you can select between Dashboard Layouts (if available) and Rules for calculations.
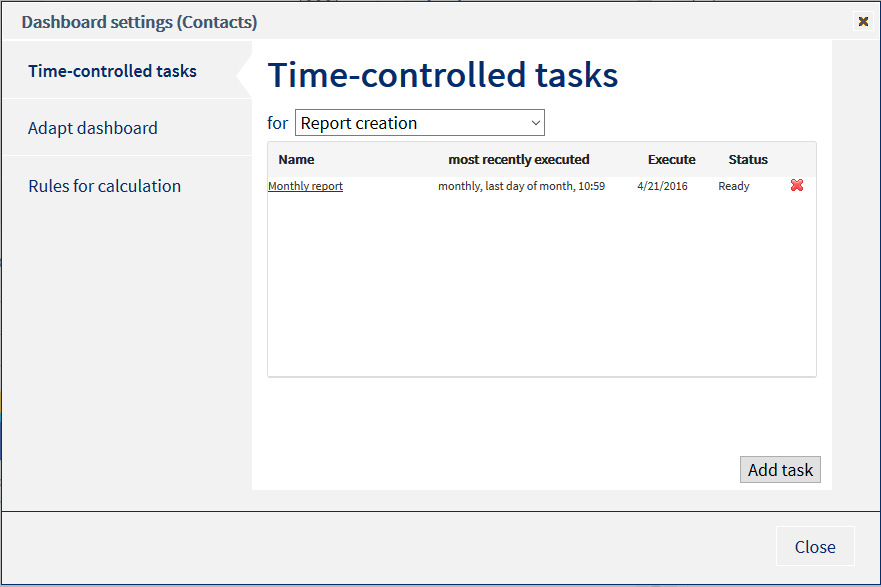
Time-scheduled tasks
Here you can define time-triggered tasks to create reports and data exports.
- "Add task" button
Using the "Add task" button, you can create a new timime-scheduledask. The "Create tiime-scheduledtask" dialog opens. All set filters and settings of the evaluations in the currently selected dashboard at this point in time are used for the subsequent execution of the task for the report creation. These filters and settings cannot be changed after the creation of the task. If other filters should be used afterwards, the task must be deleted and newly created.
"Create tiime-scheduledtask" dialog
- Name of the task
Give the new task an appropriate name. This is also used as the name for the report file if the name should be automatically generated. - "Settings data export/report" button
A dialog opens in which you can define how the report or data export should appear. The dialogs are described in the chapters: Create report and Data export. - When should the task be executed?
It is possible to execute the task every month, every week, every day or once at a certain time. For a monthly execution, you can choose a day when the task should be executed. For example, if you want to receive a monthly report, you can define that it should always be created on the first of the month, e.g. at 5 am, and sent to you by email. As a dashboard filter, choose the "Last month" time period. For a weekly execution, you can select the weekday when the report should be executed. For example, every week Tue-Sat. As a filter in the dashboard, choose "Last day" as the time period.
- "Send by email" after execution of report/data export
If the SMTP setting has been correctly configured by your administrator, you can to send results of the time-scheduled task by email to yourself or other persons.
- Send mail to
Enter the email address of the recipient here or optionally a list of several email addresses separated by ";". - Subject
Text that should appear in the subject of the email - Text in the mail
Text that should appear in your email.
- Send mail to
- "Save in a directory" after execution of report/data export
Choose this option to save the event of the time-scheduled task in a directory.
- Directory
Select a directory from the list in which the report or data export should be saved. - Generate file name automatically
A unique file name is generated automatically. It consists of the name of the task and the time period of the data.
If this option is not activated, you can define a file name yourself. - Archive
If the option "Archive" is activated, the event is saved as a copy in the directory or in a Zip archive. - in directory
Archive directory. The reports are archived in this directory.
- Directory
With the "Finish" button the task is created and appears in the task list. - Name of the task
- Edit a time-scheduled task
To edit an existing task, click on the name in the task list. Now open the "Edit tiime-scheduledtask" dialog. The fields of this dialog correspond with the "Create tiime-scheduledtask" dialog described above. Press the "Apply" button to apply the change. Filters and settings of the task can no longer be changed here. To do this, the task must be deleted and newly created. - Delete a time-scheduled task
To delete a task, click on the red cross of the task in the task list to delete it. - Manual execution of a time-scheduled task
To start a task manually, click on the status in the task list.
Adapt dashboard
If there are several layouts, that is to say arrangements of the evaluations, for the dashboard, you can choose between them.
Rules for calculation
Here you can define the rules for which a call should be classified as missed:
-
when no connection is established
As for ProCall Analytics version 1.x, calls are classified as missed when no connection has been established. - when the connection duration was less than x seconds
You can define from which call period a call is classified as missed, e.g. 20 seconds. In this way, calls that went to a mailbox can be detected, for example.
 |
The rules set here for the calculation refer to all dashboards. |
Behavior for group calls
Here you can set how to proceed with missed group calls. You can determine which person / persons are classified as "missed". Choose between the following options:
- For the first participant who did not answer the call.
- For the last participant who did not answer the call.
- For all participants of the call group.
- For no participants of the call group.
|
An evaluation of group calls is only available in the employee dashboard and the management summary dashboard. |
|
The corresponding evaluations are only possible after an update of estos UCServer to version 5.1.105 or higher. The journal data for the ProCall Analytics evaluation must be newly perpared for this. |
 |
The selection of the first or last participant is only useful when using cyclic call groups. |
|
When selecting the first participant or all participants, an additional limitation is possible that only evaluates group calls as missed which no particpant accepted. |
Version 8.1